 By TGP DJ Desk · August 24, 2026
Ott plugin is not a magic loudness button, and the ott plugin myth is why so many bedroom drops sound wide, bright and weirdly weak. The accepted advice is simple: put OTT on a synth, turn the depth up, enjoy instant energy. That advice is half true. OTT can pull detail out of a dead bass patch, make a vocal chop spit forward, and turn a flat supersaw into something that feels expensive. It can also drag room noise, reverb tails, clicky transients and 3 kHz pain right into the listener’s face.
The better move is to treat OTT as a specific multiband upward/downward compressor, not a personality preset. That means gain matching, choosing the right band balance, automating depth, and knowing when FL Studio Maximus, Ableton Multiband Dynamics, or a dynamic resonance tool is the cleaner option.
Myth: The ott plugin Is Just a Loudness Button
The usual belief is that OTT makes sounds louder. Wrong target. Loudness is the side effect. The real action is multiband compression, especially upward compression, which raises quiet details inside separate frequency bands while also clamping peaks.
That is why OTT feels more aggressive than a normal bus compressor. A regular compressor mainly turns down peaks above a threshold. OTT can make the hidden stuff louder too: breath noise, synth fizz, reverb tails, pick attack, FM grit, and the tiny stereo bits you forgot were there.
How the ott plugin Actually Moves the Signal
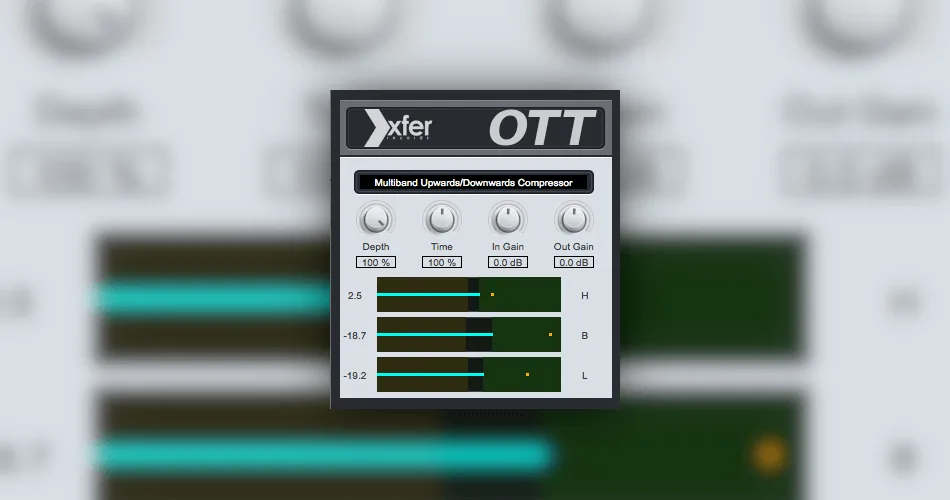
Xfer Records OTT is based on the famous Ableton Live Multiband Dynamics preset. It splits the signal into low, mid and high bands, then applies a heavy mix of upward and downward compression. The Depth knob is not a volume knob. It is the amount of processing.
Start at 10 to 30 percent depth. Match the output level to the bypassed level within about 0.5 dB. If the processed version only wins because it is louder, it has not earned its place.
The Measurement That Matters
Put a loudness meter after OTT and watch short-term LUFS plus peak level. A synth that jumps from -18 LUFS to -13 LUFS after OTT will feel better for three seconds, then eat the vocal and hi-hats. Pull the output down until bypass and active sound equally loud, then judge tone.
- For bass midrange: try 15 to 25 percent depth.
- For vocal chops: try 8 to 18 percent depth.
- For noisy risers: try 30 to 45 percent depth, then filter the hash.
- OTT raises quiet detail as well as controlling peaks.
- Depth changes the processing amount, not just loudness.
- Output level matching stops you from being fooled.
- The high band often causes the first real problem.
- A good setting usually sounds less dramatic than the default.
Myth: The Free Xfer OTT Preset Works on Everything
The free Xfer OTT plug-in is useful because it is blunt. That is also the trap. The default setting is not a universal mix move. It is a dramatic sound-design move with a very obvious fingerprint.
Use it like distortion or chorus: commit when the character helps, skip it when the part already has enough movement. In our own reviews of stems, MIDI files, project files and release-ready audio packages, overcooked OTT on mid-bass and lead stacks is one of the fastest ways to spot an unfinished mix.
Better Starting Settings for Common EDM Parts
On a supersaw, set Depth around 20 percent, Time around 100 percent, and pull the high-band gain down 1 to 3 dB if the top starts hissing. On a growl bass, use 15 percent depth before distortion, or 10 percent after distortion. After distortion, OTT exaggerates fizz fast.
For a vocal chop, put OTT before delay and reverb, not after. If it sits after the wet effects, it will raise every tail between phrases and smear the groove.
When Ableton Multiband Dynamics Beats Xfer OTT
Ableton Live users should not ignore Multiband Dynamics just because the free version is quicker. The Ableton device lets you adjust band crossovers, expansion and compression behavior in a more surgical way. If the low mids are pumping at 180 to 300 Hz, move the crossover and fix the band instead of crushing the whole signal.
For a thick pad, try low/mid crossover around 180 Hz and mid/high around 3.5 kHz. Keep the lows steadier, let the mids breathe, and tame the highs separately.
- Supersaws usually need less depth than you think.
- Growl basses often sound cleaner with OTT before distortion.
- Vocal chops should usually feed delays, not compress delay tails.
- Ableton Multiband Dynamics gives better control over crossover problems.
- The default preset is a sound, not a mix standard.

Myth: OTT plugin FL Studio Means You Need a Special Version
A lot of FL Studio users search for a separate OTT plugin FL Studio build. You do not need one. You need the correct plug-in format, the right install path, and a rescan inside FL Studio’s Plugin Manager.
The cleaner question is whether you should use Xfer OTT at all, because FL Studio already has Maximus. Maximus is not an OTT clone, but it can handle multiband compression with more control and less preset damage.
OTT plugin Install for FL Studio
Use the official ott plugin download from Xfer Records. Install the Windows VST version into a folder FL Studio scans, such as your shared VST3 folder or a custom plug-in folder you have added in Plugin Manager. Open FL Studio, go to Options, then Manage Plugins, and run a scan.
If it does not appear, check that you installed the correct 64-bit version and that FL Studio is scanning the actual folder. Do not scatter VST files across five random locations. That becomes a session maintenance problem later.
Why Maximus Can Be the Better FL Move
Maximus lets you draw and shape compression curves per band. That matters when a sound only needs low-mid grip, not a full-band clamp. For a muddy Reese bass, set a mid band roughly from 140 Hz to 1.8 kHz, compress 2 to 4 dB on peaks, then add make-up only if the bypass match still feels dull.
If you want the classic OTT bite, use Xfer. If you want a bass to fit the kick without turning into sandpaper, Maximus usually wins.
- There is no special FL-only OTT requirement.
- Install the correct VST format and rescan Plugin Manager.
- Use Maximus when you need band-specific control.
- Use Xfer OTT when you want the obvious aggressive character.
- Keep plug-ins in a tidy folder structure before big projects.
Myth: More Depth Always Means More Energy
The loudest lie in OTT advice is that higher depth equals a bigger drop. Past a point, more depth flattens contrast. The transient gets smaller, the noise floor rises, and the chorus feels busy without actually hitting harder.
Dance music needs contrast. A drop works because the kick, bass, lead and effects take turns creating pressure. If every layer has 70 percent OTT, nothing steps forward. It becomes a bright rectangle.
Automate Depth Instead of Leaving It Static
Use automation like arrangement, not repair. Try 0 to 10 percent OTT during the pre-drop, then 18 to 25 percent for the first 4 bars of the drop. Pull it back 3 to 5 percent when the vocal hook enters. That keeps the hook from fighting a hyped lead stack.
For fills, a short burst can work. Push depth to 35 percent for one beat before the drop, then snap it back. The ear hears excitement without the whole section turning harsh.
Filter Before OTT When the Low End Lies
OTT reacts to what you feed it. If a synth has unnecessary 40 Hz rumble, the low band will work on garbage. High-pass non-bass synths around 100 to 150 Hz before OTT. For a lead with brittle fizz, low-pass at 12 to 16 kHz before the compressor, then add air later if needed.
This feels backwards to some producers. It is not. Clean input means the compressor grabs the useful part of the signal.
- High depth can reduce impact by flattening transients.
- Automation keeps OTT from fighting the arrangement.
- Short bursts work better than full-section punishment.
- Filtering before OTT gives the compressor better information.
- Drop energy comes from contrast, not constant compression.

Myth: OTT Is Fine on the Master Bus
The master-bus OTT myth refuses to die because it sounds exciting for about eight seconds. Then the problems show up: splashy hats, unstable low end, vocal edge, and a limiter that starts shaving the wrong peaks.
Mastering is not where you fix a dead sound-design chain. If the drop needs OTT, put it on the synth group, bass layer, vocal chop or effects return. Master processing should preserve the record’s shape, not rebuild it with a sledgehammer.
The Safer Master Test
If you insist on testing OTT across the mix, keep depth under 5 percent and gain match hard. Watch the kick fundamental around 45 to 60 Hz and the vocal presence around 2.5 to 5 kHz. If either area jumps forward, you are probably changing the mix rather than improving the master.
A safer mastering chain is usually subtle EQ, gentle bus compression doing 1 to 2 dB, soft clipping for peak control, then limiting. OTT rarely belongs there.
Use Dynamic Control Where the Pain Actually Lives
If the problem is harshness after OTT, do not put more broadband compression on the master. Use dynamic EQ or a resonance suppressor on the offending bus. oeksound Soothe2 can calm 3 to 7 kHz spikes on a lead stack without pulling the whole drop down.
For a cheaper route, use your DAW’s dynamic EQ if it has one. Set a narrow band, trigger only on the harsh notes, and aim for 1 to 3 dB of gain reduction.
- Master-bus OTT usually changes the mix too much.
- Depth under 5 percent is the only sensible test range.
- Harshness should be fixed on the bus causing it.
- Dynamic EQ is cleaner than crushing the whole master.
- A strong mix needs less master processing, not more.
Myth: Ott plugin crack Searches Save Money
The ott plugin crack search makes no sense because the real plug-in is free. The ott plugin price is zero from the official Xfer Records freeware page, so a cracked installer adds risk without adding value.
Cracked audio tools are not just an ethics problem. They break recall, fail validation, trigger security warnings, and can turn a deadline session into a rebuild. For a free utility, that trade is absurd.
Use the Official OTT Plugin Free Download
Go to Xfer Records’ freeware page for the ott plugin free download. That gives you the current installer and avoids fake download pages using the plug-in name for traffic. On Windows, install the proper VST format. On macOS, install the supported format for your DAW and rescan.
Keep the installer backed up with your project archive. If you reopen a track two years later, you want the same tool available without hunting through sketchy mirrors.
Free Does Not Mean Disposable
A free plug-in can still be part of a professional session. Name it properly in your chain, print critical sound-design layers when the sound is final, and save an unprocessed MIDI or audio version on a muted track. That way the track survives a system change.
For paid custom work, this matters. A missing plug-in is not a vibe issue. It is a delivery issue.
- The official Xfer OTT plug-in is free.
- A crack is riskier than the real installer.
- Use the official source for Windows and macOS installs.
- Archive installers with important projects.
- Print finished sound-design layers when recall matters.
| Tool | Best Use | Starting Setting | My Take |
|---|---|---|---|
| Xfer Records OTT | Aggressive synths, vocal chops, FX builds | Depth 10-30%, output gain matched | Best for obvious character, worst when used blindly |
| Ableton Multiband Dynamics | Ableton users who need crossover control | Low/mid 180 Hz, mid/high 3.5 kHz as a start | More flexible than the preset if you know what hurts |
| FL Studio Maximus | FL multiband control on basses and buses | 2-4 dB gain reduction on the problem band | Cleaner than OTT when the issue is narrow |
| oeksound Soothe2 | Harshness after heavy compression | Target 3-7 kHz, 1-3 dB reduction | Not an OTT replacement, but often the fix after it |
Worth a deeper read on this: MO and OTT by Xfer Records: Free Dynamics Plugin (VST, AU).
Frequently asked questions
What is the ott plugin for?
The ott plugin is for aggressive multiband compression, especially bringing quiet details forward while controlling peaks. Producers use it on synth leads, bass layers, vocal chops, risers and effects. It is not just a loudness plug-in. Its main sound is density, brightness and forward movement.
Is OTT a free plugin?
Yes. Xfer Records OTT is free when downloaded from the official Xfer freeware page. The ott plugin price is zero, which is why crack searches are pointless and risky. Use the official installer so your DAW scan, updates and project recall stay predictable.
How do I download the OTT plugin for FL Studio?
Download OTT from the official Xfer Records freeware page, install the correct Windows VST version, then open FL Studio’s Plugin Manager and scan the folder where it was installed. If it does not appear, check your 64-bit install path and make sure FL Studio is scanning that exact folder.
Is OTT good for mastering?
Usually, no. OTT on the master bus often raises harsh highs, room noise, cymbal wash and low-end instability. If you test it, keep depth under 5 percent and gain match carefully. Most masters are better served by subtle EQ, light bus compression, clipping and limiting.
Does the OTT plugin work on Windows?
Yes, OTT works on Windows when installed in a plug-in format your DAW supports. For FL Studio, Ableton Live, Cubase and similar DAWs, install the VST version and rescan your plug-in folder. Keep your VST folders organised so projects open cleanly later.
What is a safe OTT setting for EDM leads?
For EDM leads, start around 15 to 25 percent depth, keep Time near 100 percent, and match output level to bypass. If the lead gets sharp around 3 to 6 kHz, reduce the high band or use dynamic EQ after it. The default is often too heavy.
The short version
- OTT is a multiband upward/downward compression sound, not a simple loudness button.
- The default Xfer OTT setting is useful for character but too heavy for many mix duties.
- FL Studio users can install the free VST, but Maximus may be cleaner for controlled multiband work.
- Depth automation and pre-filtering beat static 70 percent OTT on every layer.
- Master-bus OTT is rarely the right fix for a weak mix.
- Use the official free download instead of risky crack pages.
Where to go from here
The ott plugin deserves its place in EDM production, but the default smash preset deserves less trust. Treat it like a pressure tool. Feed it clean audio, start with low depth, gain match, automate when the arrangement changes, and reach for Maximus, Ableton Multiband Dynamics or dynamic EQ when the problem is more specific than “make it brighter.”
The best test is simple: bypass it at the same loudness. If the drop loses excitement, keep working. If it only loses volume, the setting was fooling you. Try that check in your next session before printing stems or sending a premaster.
My Career makes videos from your own track and posts them for you, pitches your release to 34,000+ labels, playlists, radio stations, YouTube channels and blogs, puts it in every store and briefs you every morning. Free plan, no card, two minutes to set up.